Manage employees
In Workforce > Employees, each salary line represents the salary calculation for each employee. Let's take a look around.
Navigate employees
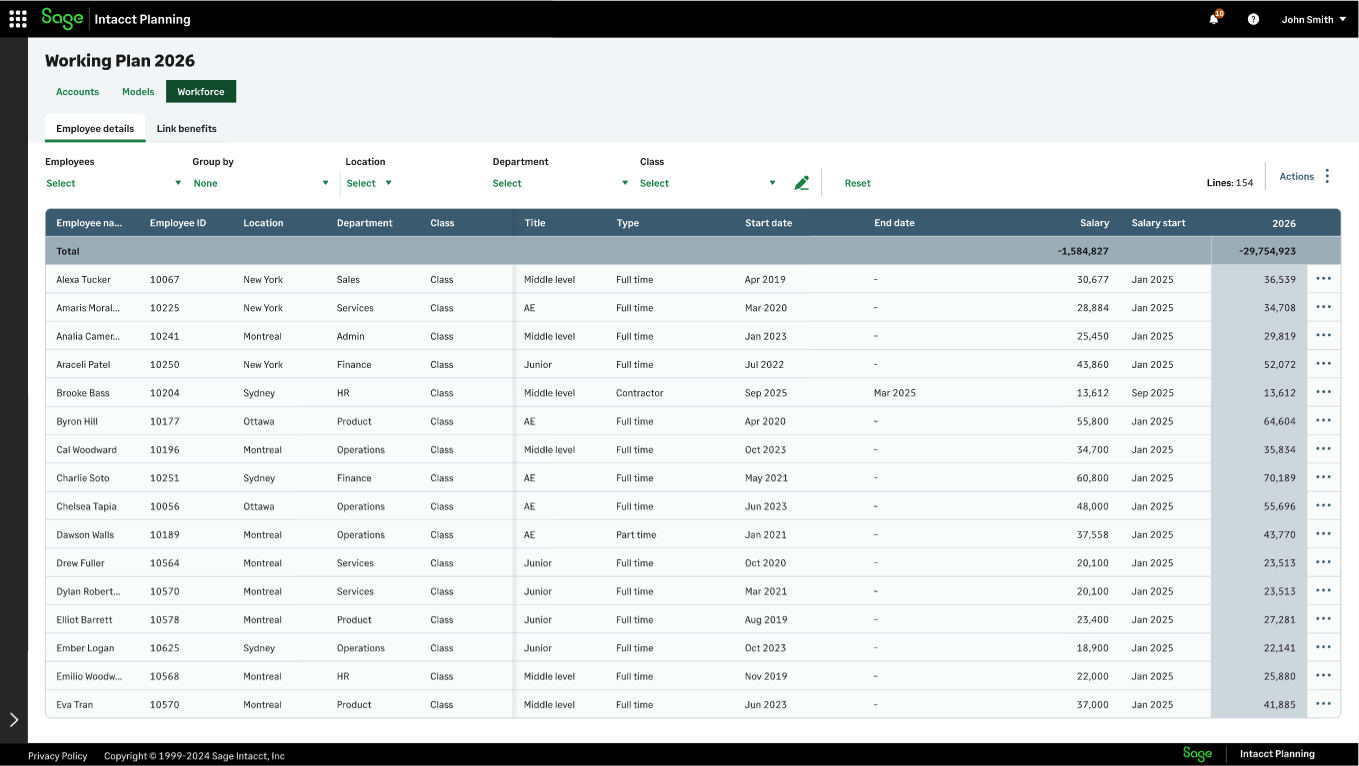
The following columns appear in the Employees grid:
| Column | Intacct source | Description |
|---|---|---|
|
Employee name |
Expenses > Employees |
Only employees with the Status set as Active in Sage Intacct appear. |
|
Employee ID |
Expenses > Employees |
Unique employee number |
|
Dimensions |
Dimensions that you associate with your workforce accounts when you create the plan. Location is default so always appears. If your plan has the Project dimension, you can Assign projects to existing employees. |
|
|
Title |
Expenses > Employees > Employee information |
The job the employee performs |
|
Type |
Expenses > Employees > Employee type |
|
|
Start date |
The start date of employment as defined in Intacct. Examples of when various start dates could appear
|
|
|
End date |
Expenses > Employees > Employee information |
An end date value only appears if:
|
|
Salary |
|
|
|
Salary start |
The date that Salary is calculated from. If an employee has multiple annual salaries, such as a mid-year raise, the number of salaries appears in brackets. |
|
|
Year |
The total annual salary and benefits for each employee. For multi-year plans, each year appears in its own column. |
|
|
Description of the employee details grid columns |
||
Assign projects to existing employees
When you create an employee in Sage Intacct, you can't assign them with a Project dimension value. In Planning, however, this option is available to you.
When you save your plan as an Intacct budget, as described in Save plan as an Intacct budget , these assignments carry through, helping you track project-specific labor costs and compare planned versus actual spend.
The following procedure describes how to do this for an existing employee. You can also assign a project when you add a new hire, as described in step 3 in Manage employees.
Start
Associate the Project dimension to your workforce accounts when you create your plan, as discussed in Create new plan > Scope > Step 2.
-
From Workforce > Employees, navigate to an employee.
-
Double click (or press and hold) the Project column.
-
Select a project from the dropdown list.
Your organization plans project costs as part of its annual planning process. Each employee is expected to support one project at a time.
When you prepare your workforce plan, you assign each employee to the project they will work on. You later save the plan as an Intacct budget, whereby each employee cost is associated with a project. This helps you see the expected cost of each project more clearly.
Change the end date of an existing employee
Start
-
Navigate to an employee that you know their last month of employment.
-
From the End date column, double click (or press and hold).
-
Select
 and select a date from the dropdown list.
Filter the employees grid
Start
-
To filter which salary lines appear in the employee details grid, do any of the following:
-
Filter by employee name: From the Employees dropdown list, select one or more employees.
-
Group by dimension: From the Group by dropdown list, select one or more dimension.
-
Filter by dimension value: From one of the dimension dropdown lists, such as Location, select one or more dimension values.
You can apply multiple filters at the same time. To see all employees, select Reset.
-
Edit full‑time employee salary
Start
-
Navigate to a salary line of an employee defined as Full-time in the Type column.
-
On the right of the salary line, select
 and then Edit.
Navigate between employees with Next and Previous.
-
In the Salary tab, select +Add salary.
-
Enter an Annual salary. For example: gross monthly salary x 12 months.
-
From Salary start, select a month for the salary to be paid from.
-
To record a new salary to be paid from a specific month onwards, such as a salary increase, repeat steps 3-5.
You can only enter one salary per month.
-
Select Remove to remove a salary line.
-
Select Save.
Changes take a few seconds to appear.
Edit part‑time employee salary
Start
-
Navigate to a salary line of an employee defined as Part-time in the Type column.
-
On the right of the salary line, select
and then Edit.Navigate between employees with Next and Previous.
-
In the Salary tab, enter the expected work hours per month for this employee under Hours per month. The default is 0.
-
Select + Add hourly rate.
-
Enter an Hourly rate, and then from Salary start, select a month for the hourly rate to be paid from.
-
To record a new hourly rate, such as an increase, repeat steps 4-5.
-
Select Save.
Changes take a few seconds to appear.
Each salary appears as a separate salary line. From the Employees tab, navigate to Employee name and select > to expand the salary breakdown.
Next steps
Is this helpful?
In this topic